
- Discussion:
- generally distal interlocks should be inserted prior to the proximal interlocks;
- this allows the leg to be rotated in the most advantageous position for interlock insertion and allows more effecient compression across the frx site (by gently tapping the proximal nail assembly proximally);
- use free hand technique beginning w/ steinman pin;
- achieve perfect circle w/o rotating distal fragment;
- Perfect Circle:
- if flouroscopy machine is already in AP plane, bring it over interlocking holes and mark exact location and direction of each hole;
- then get a lateral view, and insist on perfect circle using flouro;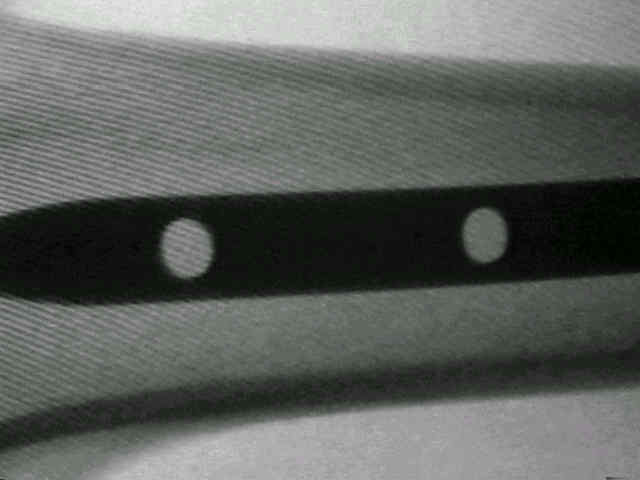
- even though the example on the right is close to having perfect circles, it is noted that the AP distance is slightly larger than the proximal-distal distance (and therefore it is not perfect);
- if proximal interlocks have already been inserted, then since rotatonal alignment should have already been achieved;
- it is essential not to rotate the thigh to obtain the perfect circle;
- rather, the flouro machince should be moved and rotated on stationary leg;

- Incision:
- mark skin incision site extending across both holes sites;
- ensure that IT-band has been incised along incision lines;
- aggressively spread thru periosteal tissue;
- Drilling Technique: (as suggested by Allen Burrus, Synthes USA)
- have three diamond tiped Steinman pins available (4.0 mm);
- note that a drill bit is 3-4 times more expensive than a Steinman pin; 
- locate the center of the perfect circle w/ a Steinman pin and then tap through the outer cortex and medullary canal, but do not tap through the far cortex;
- tapping across the far cortex may cause comminution;
- use the second Steinman pin to fill the remaining interlocking hole (using the same technique);
- swing the flouro machine to the AP plane, and then use the drill to guide both pins carefully across the far cortex;
- use the third Steinman pin to help measure the proper screw length by placing it adjacent to the other Steinman pins (and measuring the distance that does not over lap);
- if drill bits are to be used, then:
- insist on using short drill bit (so as it will not interfere w/ C-arm)
- also insist that the drill bit be sharp;
- Synthes Interlocking Screws:
- permits transverse distal locking with two 4.9 mm locking bolts;
- 20 mm distance from distal hole to nail tip accommodates distal fx
- self cutting trocar 4.9 mm thread & 4.3 core diameters;
- Alternative Techniques:
- cannulated screws:
- as demonstrated by Barrick EF (1993), drilling for distal interlocking can be safely be performed w/ use a cannulated drill set;
- 30 patients had interlocking screws inserted w/ this system w/ no complications;
- one concern w/ this technique is that cannulated drills are weaker than solid drills, and thus may be prone to breakage w/ eccentric guide wire placement;
- setscrew distal interlocking:
- in the report by Kose N, et al. (2000), the authors evaluated the fixation strength of set screws vs interlocking screws;
- technique invovlves insertion of two screws which penetrate only the lateral cortex of the femur and compress against the IM nail;
- set screw depends on compression to develop a clamping force;
- the set screw provided 87% of the torsional strength of the interlocking group;
- the authors recommend more proximal insertion of the set screws in osteoporotic bone since this will take advantage of the thicker cortical bone;
- references:
- Distal Locking Screw Insertion Using a Cannulated Drill Bit: Technical Note.
- Setscrew distal locking for intramedullary nails: a biomechanical study.
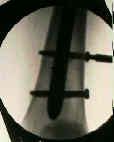
- Hazards:

- this nail was inserted asymmetrically down the meduallary canal, complicating interlock drilling;
- even though the nail is not centered, the interlocks still must be centered on the nail, otherwise they will jam up during insertion;
- Removal of Broken Interlocking Screws:
- after perfect circles are established, make a small stab incision medially and laterally and bluntly spread down to the femoral cortex;
- the lateral portion of the screw can be removed w/ ease;
- use a Steinman pin to push the medial portion of the broken screw into the medial wound
Distal screw targeting of interlocking nails.
A simplified technique of distal femoral screw insertion for the Grosse-Kempf interlocking nail.
Interlocking intramedullary nailing in femoral shaft fractures. A report of forty-eight cases.