
CPT Jessica D. Cross
CPT Daniel R. Possley
CPT Daniel R. Possley
A. Describe the initial non-surgical and surgical management of extremity fractures
I. Introduction
A. Majority of wounds sustained by soldiers in combat zone are to the extremities, largely due to the nature of modern body armor1
B. Similarly, high energy extremity injuries are seen during natural disasters
1. 85% of injuries sustained by earthquake victims in Haiti were orthopedic nature2
2. included fractures and amputations
C. Surgeons caring for victims of war and disaster must be aware of management challenges of extremity fractures in austere environment
1. care follows many of the same principles used in treating same injuries at any U.S. civilian trauma center
2. appropriate wound management followed by fracture stabilization are mainstays of treatment
II. Initial Assessment
A. Primary and secondary surveys must come first
B. Extremity injury first step
1. if bleeding, control hemorrhage
2. if vascularity disrupted, restore perfusion
C. Extremity injury exam
1. in alert patient
a. perform exam to assess injured compartments
b. check pulses
c. assess neurological status
2. in obtunded patient
a. examine and palpate compartments
b. check pulses
III. Wound Management
A. Early and thorough wound debridement
1. far-forward injury care may not have capacity to administer surgical debridement, but early irrigation with removal of gross contaminants likely possible at any level of care
2. thorough surgical debridement and irrigation should be performed as early as possible (see debridement section)
a. debris and devitalized tissue should be removed
b. bone fragments with any soft tissue attachment should be maintained; bone fragments that are devitalized should be debrided with exception of large articular fragments
c. preserve viable tissue in order to permit receiving physicians greatest number of definitive care options
B. Administer antibiotics as soon as possible, primarily broad spectrum cephalosporin
C. Fracture instability can compromise tenuous soft tissue viability; therefore, fracture stabilization is part of soft tissue wound management
D. Fracture stabilization will help protect open wounds from further soft tissue damage and is crucial in the setting of a vascular repair
IV. Non Surgical Fracture Management
A. Advantages
1. splints may be the only far-forward option for fracture stabilization
2. splints afford receiving surgeon greatest number of surgical options
3. splinting may be most appropriate option for low energy and closed fractures, such as wrist, hand, ankle, and foot fractures
B. Principles
1. address open wounds first
a. document status of open wounds that will be covered by splints for continuity of care
b. status of underlying wounds may be written directly on splint
2. if patient is to be transported, splints must be suitable for mode of transportation and acceptable within limits of passenger space
3. caution should be utilized so splints are not constrictive or predispose to compartment syndromes, especially prior to long evacuations
4. temporary splints intended to limit further injury
a. not meant to be definitive treatment
b. definitive reduction may not be possible or necessary
5. in general, splints should immobilize joint above and below injury
C. Upper extremity splints and casts
1. finger and hand injuries may be immobilized with standard splinting methods
2. forearm and elbow injuries may be best splinted with long arm posterior splint, double sugar-tong splint, or bivalved long arm cast
3. humerus and shoulder fractures best immobilized using a Velpeau cast, padding the arm against the chest
a. Velpeau casts require casting material to be wrapped around the trunk and may not be appropriate for casualties with chest injuries
b. always bivalve Velpeau casts, which will allow for cast removal if patient develops respiratory compromise
D. Lower extremity splints and casts
1. tibia and ankle fractures may be splinted; slab splinting, however, may provide adequate stability for transport if fracture is highly unstable or fracture is surrounded by tenuous soft tissue envelope
a. long leg casts provide most stable immobilization
a. long leg casts provide most stable immobilization
b. cast with knee flexed 20 degrees and place supracondylar mold
c. bivalve cast
2. hip and femur fractures can be immobilized with hip spica cast
a. bony prominences must be well padded, including the sacrum and anterior superior iliac spines
b. spica casts require abdomen be wrapped in the cast, and therefore may not be suitable for polytrauma patients with abdominal trauma
c. adequate space must be left about the perineum for hygiene
d. bivalve the cast
V. Surgical Fracture Management
A. Introduction
1. open fractures should receive thorough surgical debridement as soon as possible to decrease incidence of infection
2. surgical management may include internal and external fixation
a. internal fixation, due to logistical constraints and concern for contamination, not ideal in austere environment
b. surgeon should be well versed on external fixator placement about humerus, forearm, femur, and tibia
B. Advantages of External Fixation
1. external fixation affords adequate fracture stabilization to minimize additional soft tissue trauma
2. external fixators allow access to soft tissue for wound care and frequent assessments
3. external fixation may be rapidly applied in setting of polytrauma and mass casualties; this is also of physiological benefit, as early fracture stabilization is recommended to blunt inflammatory mediators associated with fractures in polytrauma
4. stability afforded by external fixation is also beneficial for pain control and ease of transport, avoiding remanipulation of splints or casts during transport and at each higher echelon of care
C. Principles
1. external fixation in austere environment is performed within restrictions of equipment and fluoroscopy availability
2. specific portable external fixation kits designed for military use include the Hoffman II sterile field kit (Stryker Howmedica Osteonics, Rutherford, NJ); kit contains carbon fiber rods, clamps, and self drilling and taping pins that may be inserted without the need for electrical power drilling (figure 1. Stryker Hoffmann II sterile field kit.)
.jpg)
3. frame stability may be increased by optimizing reduction, minimizing bone-to-bar distance, maximizing space between pins, and adding additional pins
4. using minimum number of pins possible to maintain fracture stabilization will allow receiving surgeons the most options; consider future internal fixation plans when choosing pin placement
5. external fixation has been shown to be safe in austere environment with no major complications (defined as neurovascular injury, mechanical failure, septic joint, and pin tract osteomyelitis) identified in recent review of 55 tibial external fixators3
B. Demonstrate appropriate application of an external fixator with limited resources and stability for transport
I. Introduction
A. External fixation may be performed in austere environment without use of fluoroscopy
B. Ideally, pins should be placed to minimize impact on future internal fixation
II. Pin Placement
A. Should be performed as follows (see femoral external fixation replacement video)
1. make small vertical incision at site of pin placement
2. spread down to bone bluntly
3. load pin in drill or manual driver and place pin into incision until pin meets bone
4. use pin tip to feel either side of bone
a. for example, lateral pin placement in femur should be performed through mid portion of shaft
b. “walk” pine anteriorly and posteriorly to feel edges of bone so that mid portion may be identified
5. advance pin through near cortex; stop at purchase of far cortex without over-penetrating (figure 2. Avoid pin over-penetration regardless of location of pin placement. Once the external fixator pin engages the far cortex, an additional 4 or 5 turns will be required to advance the pin appropriately without over-penetrating.)
.jpg)
6. subsequent pin placement on same bone should be performed in parallel to allow pin-to-bar clamps to engage both pin elements without difficulty; clamp may be used as guide for placement
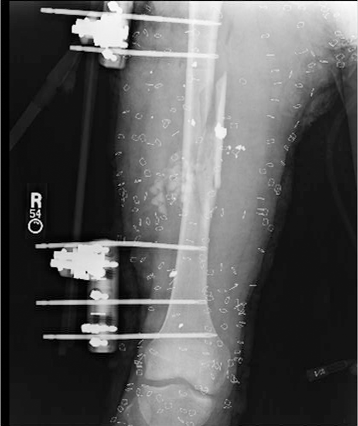
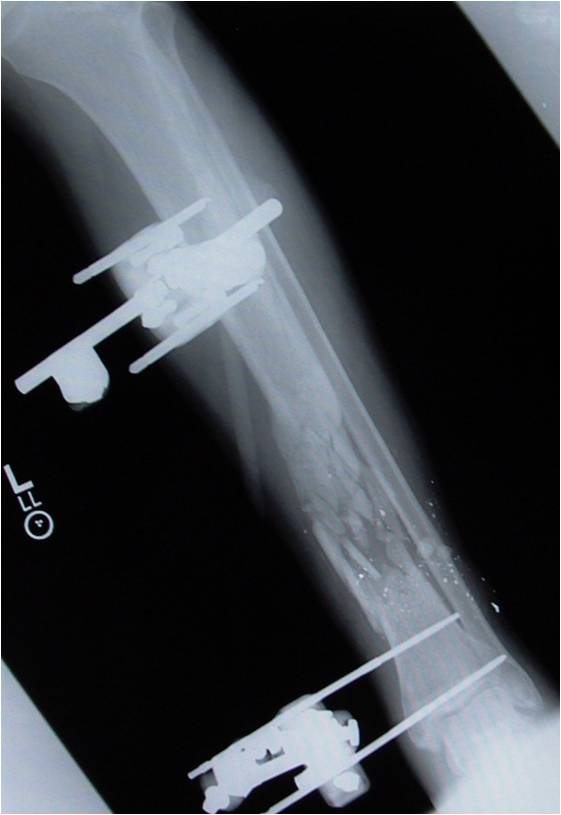
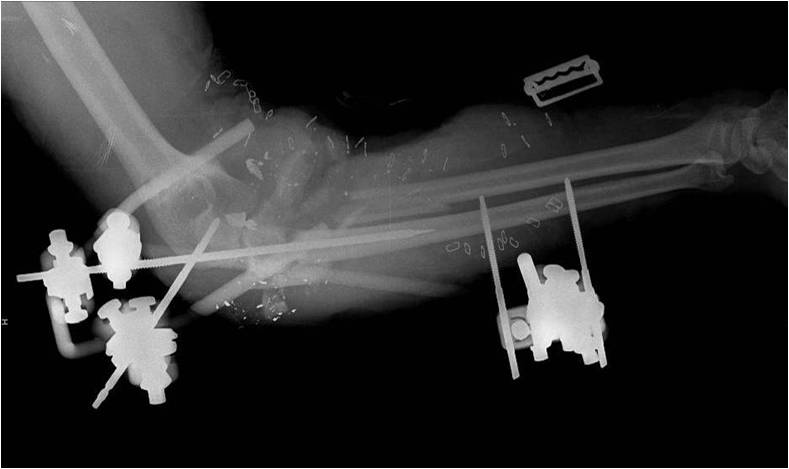
7. avoid pin positioning too close to fracture site (pins within fracture itself will decrease external fixator’s ability to maintain stability of fracture) (figure 3 and figure 4. The anteroposterior radiograph of this tibia suggests adequate external fixator placement, however, the lateral radiograph shows that the proximal pin of the distal pin group is within the fracture.)
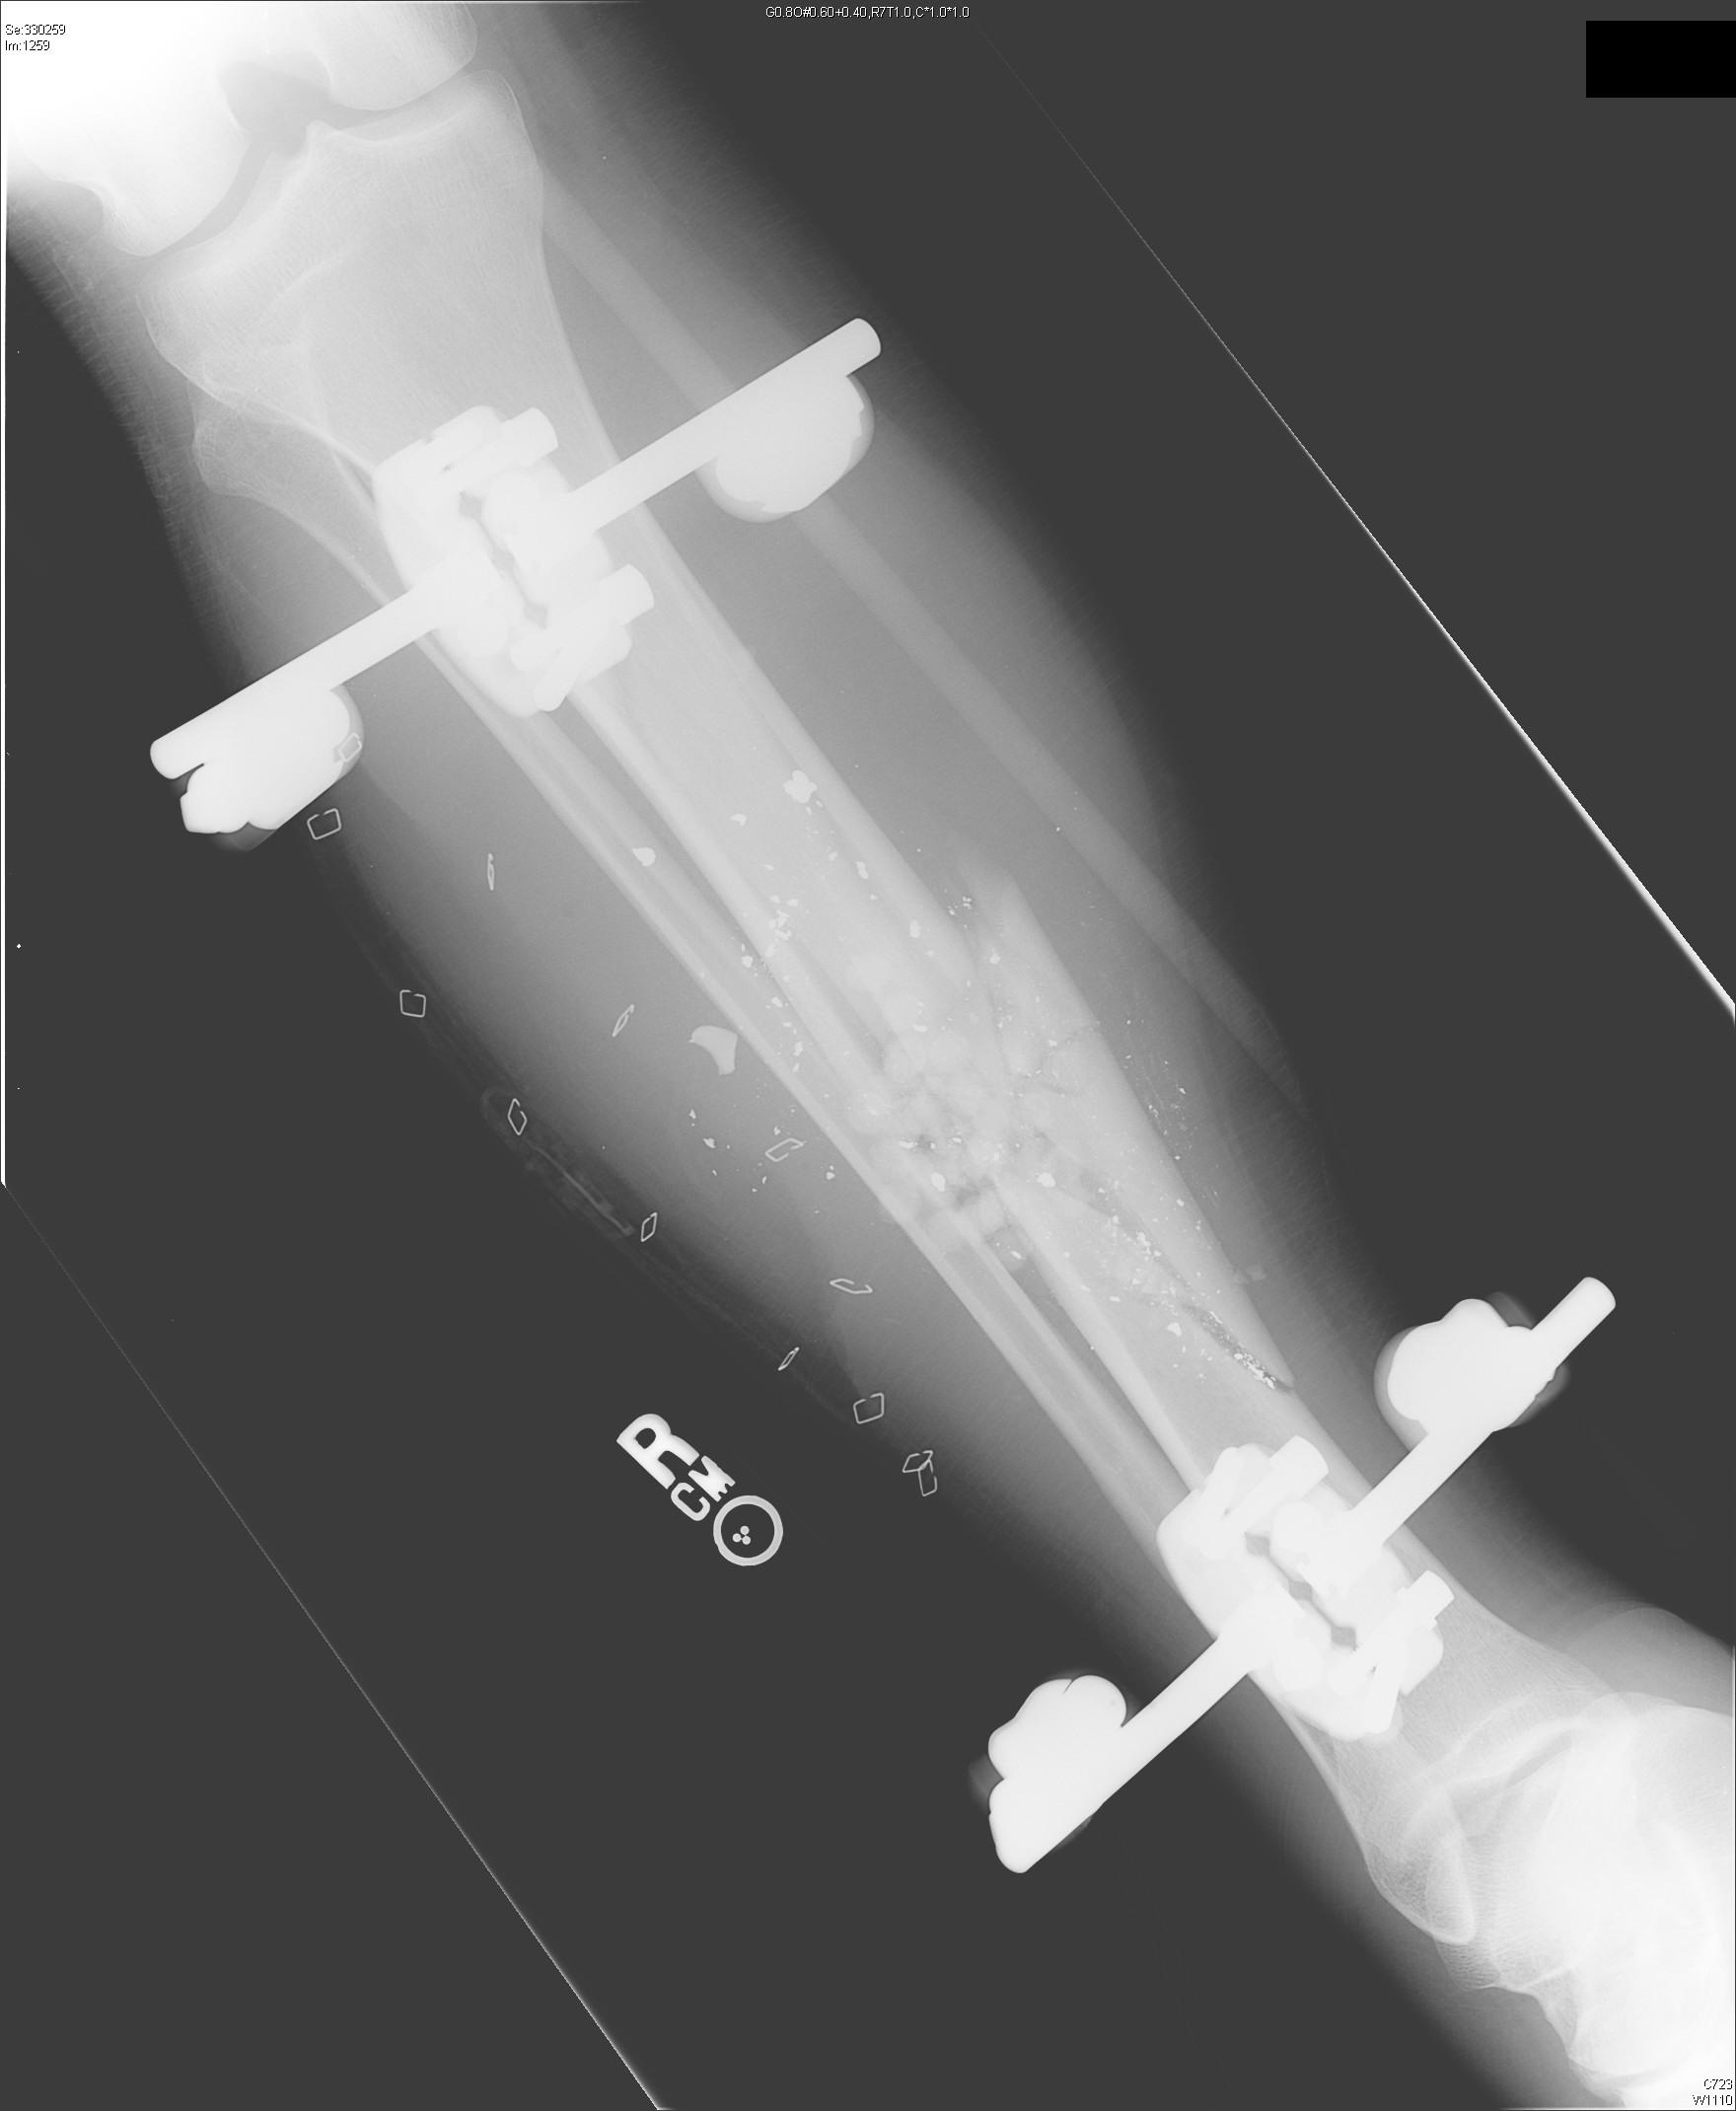
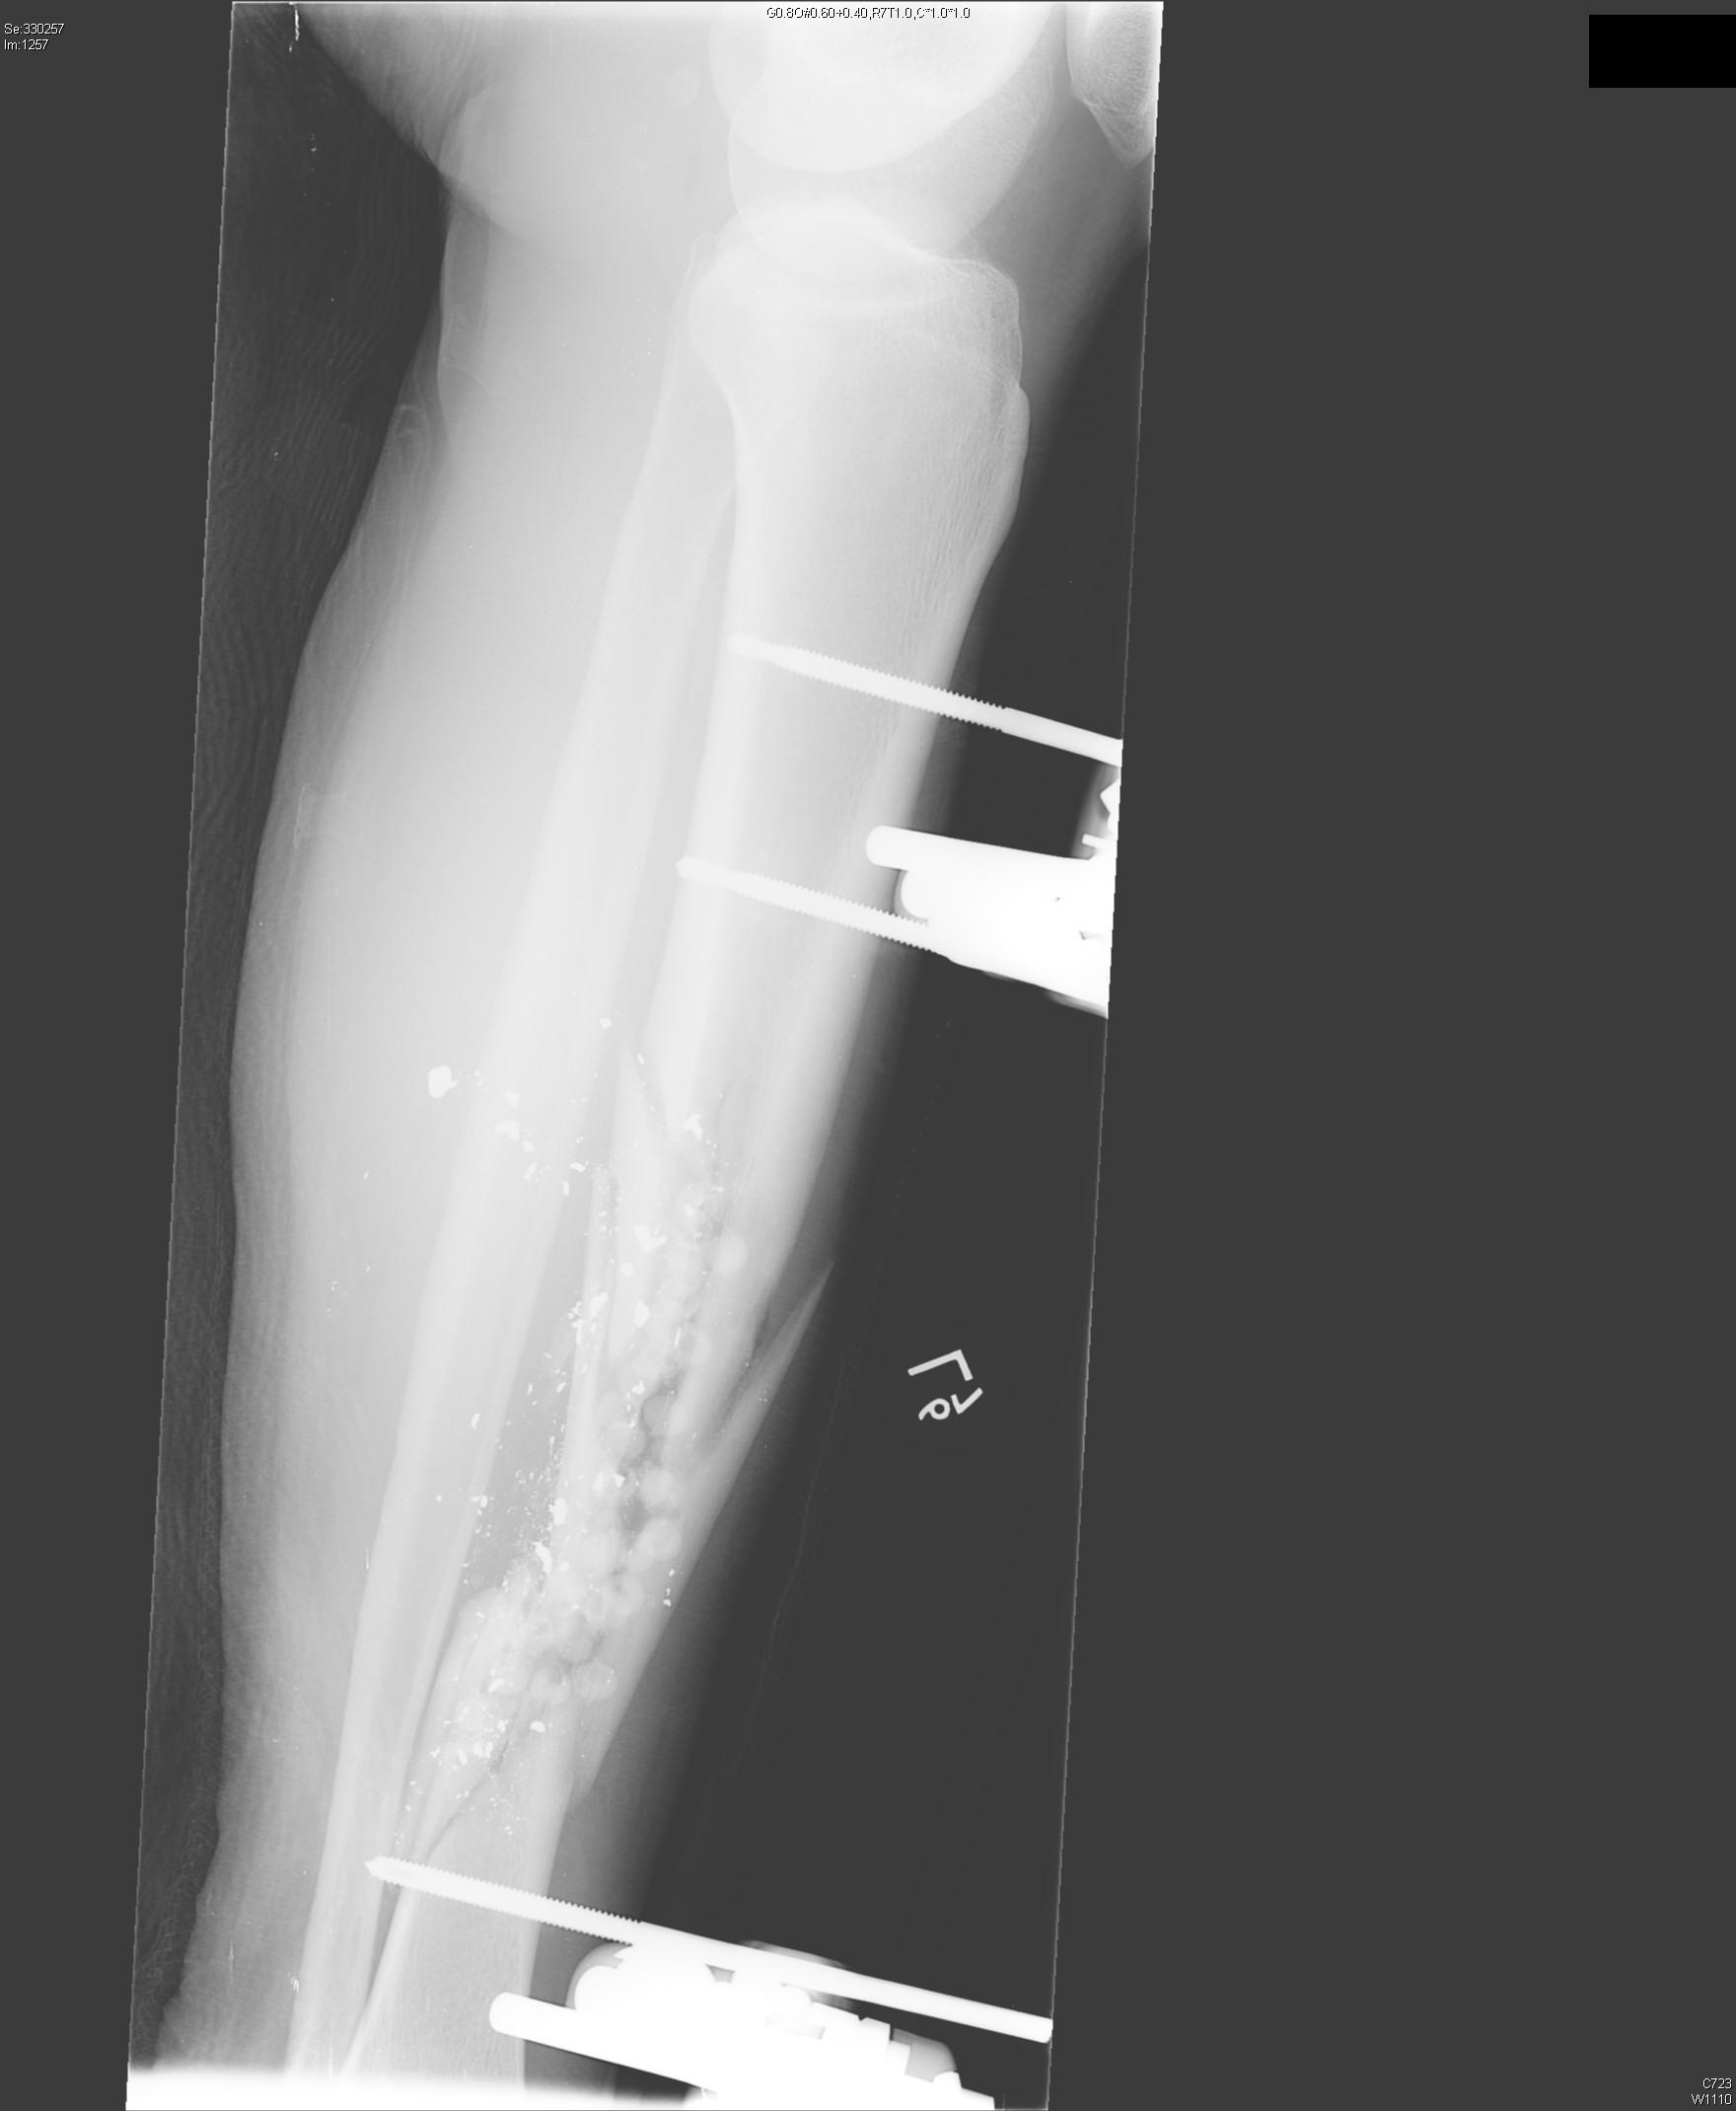
8. external fixators may be placed to span joints if fractures extend into articular surface
B. Femur
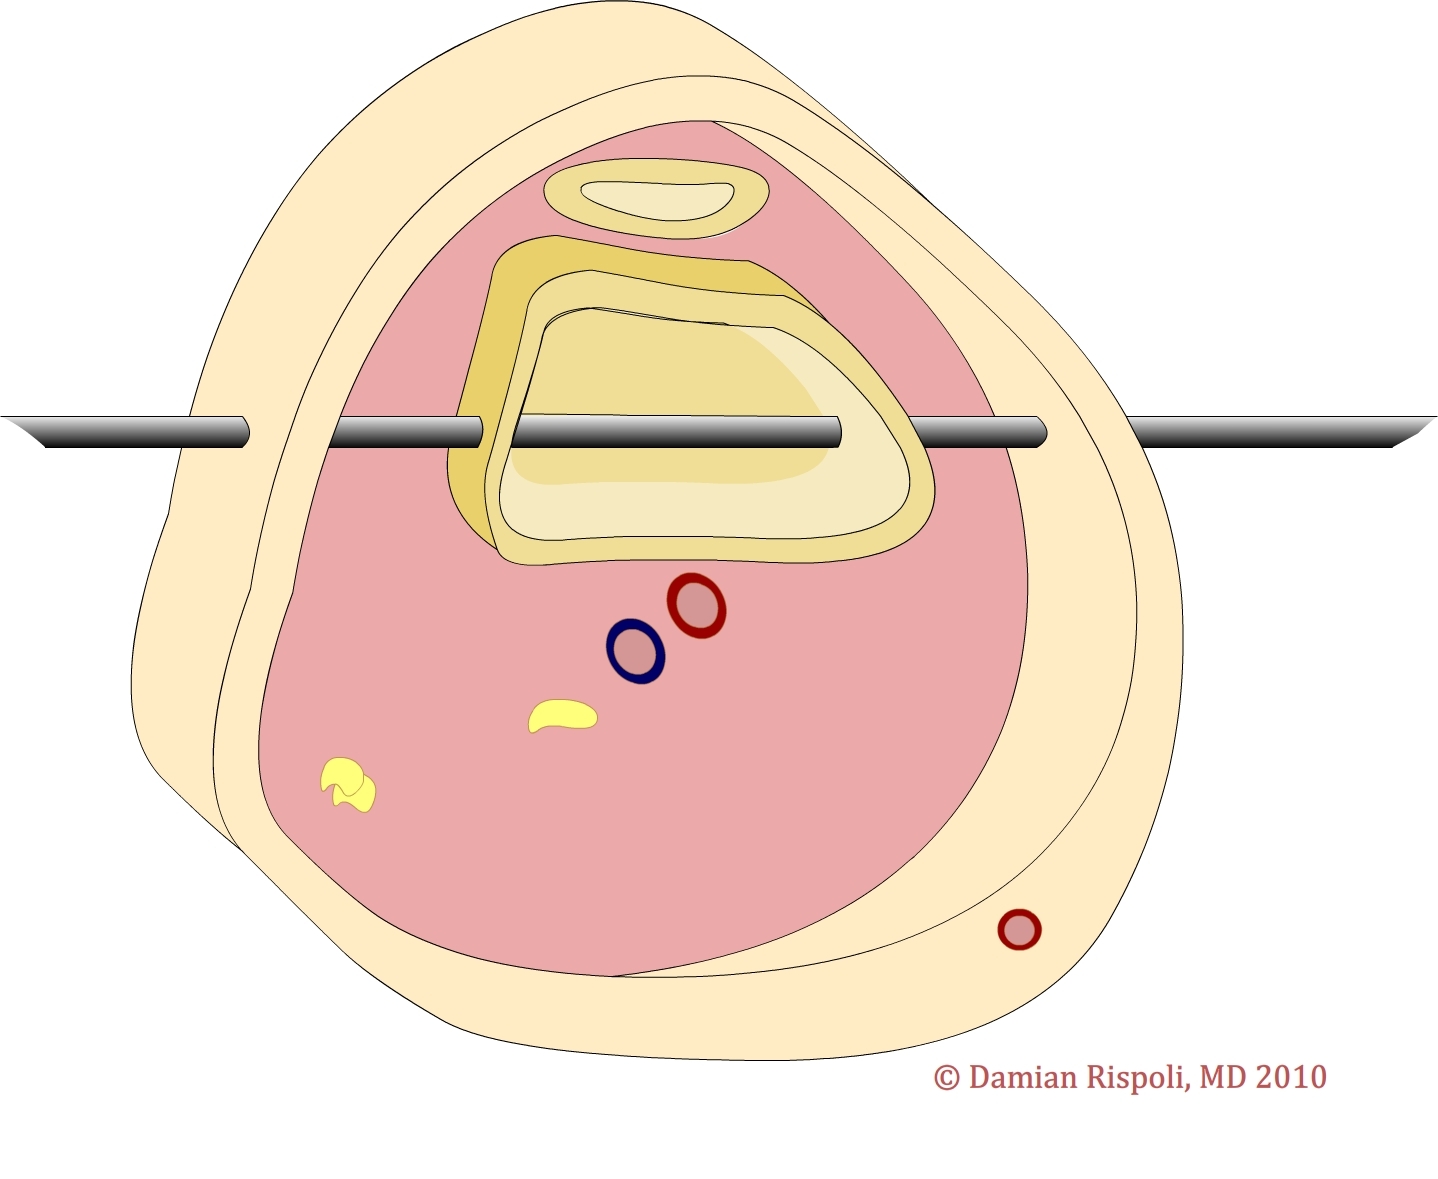
1. half pins may be inserted at any point along lateral aspect of femur with low risk to neurovascular structures; over-penetrating medial cortex may put profunda femoris artery at risk
2. anterior half pins may be used in midshaft; however, posterior cortex must not be violated so as not to injure sciatic nerve
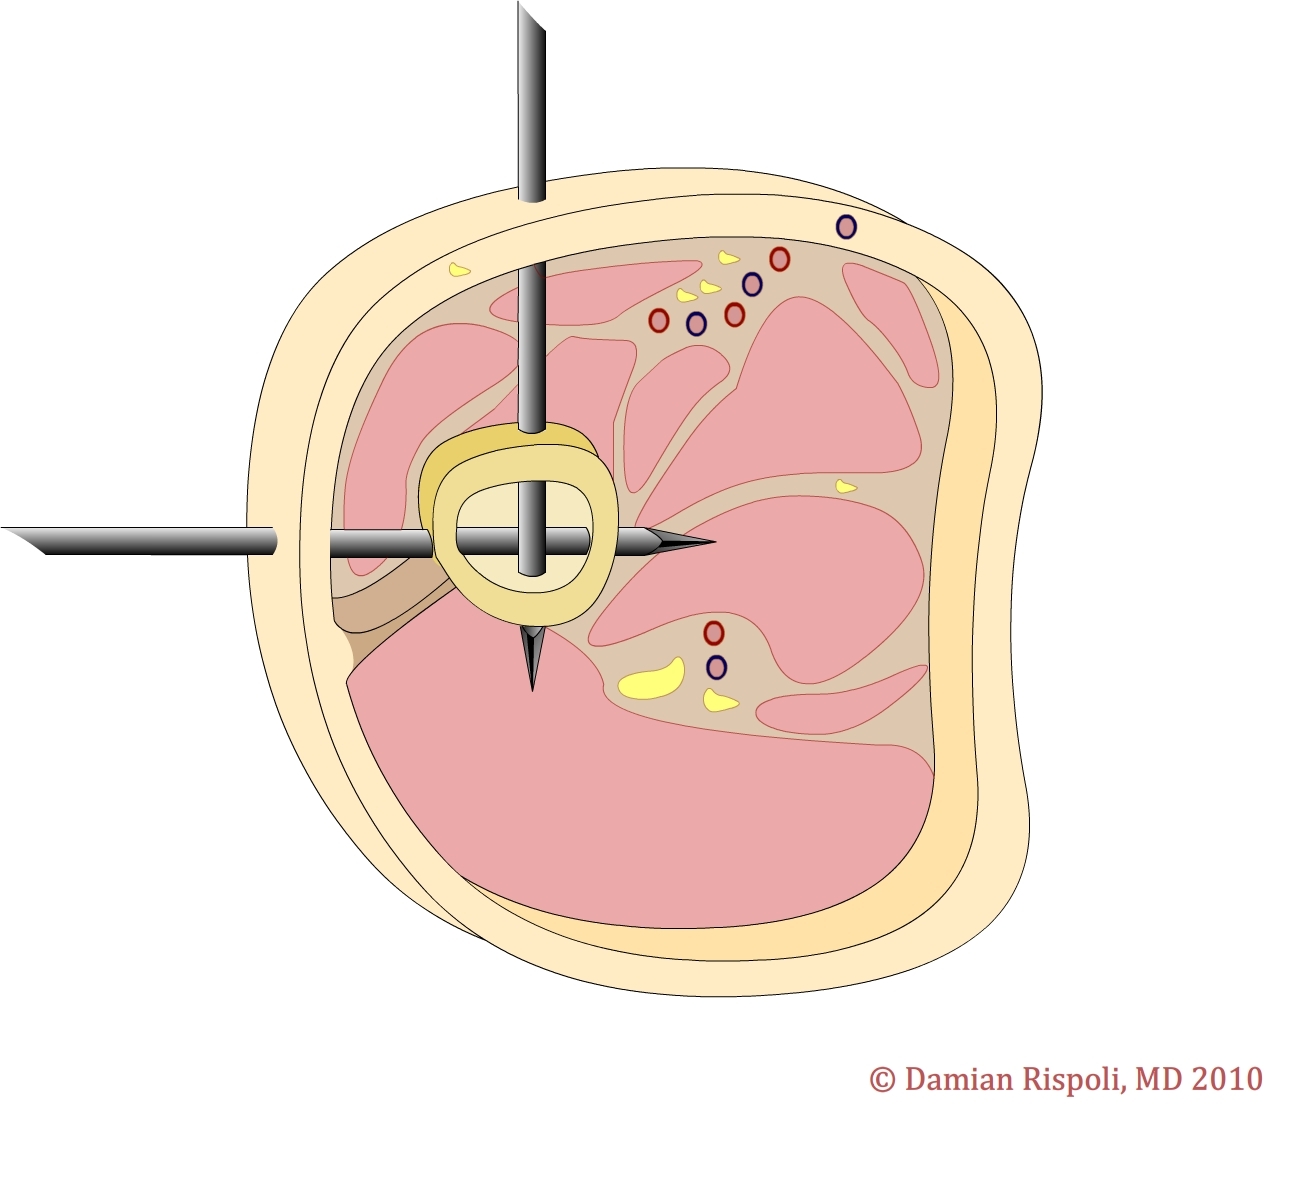
3. transfixtion pins may be placed distally, however, assure adequate proximal distance from knee joint capsule; pins should be placed medially to laterally
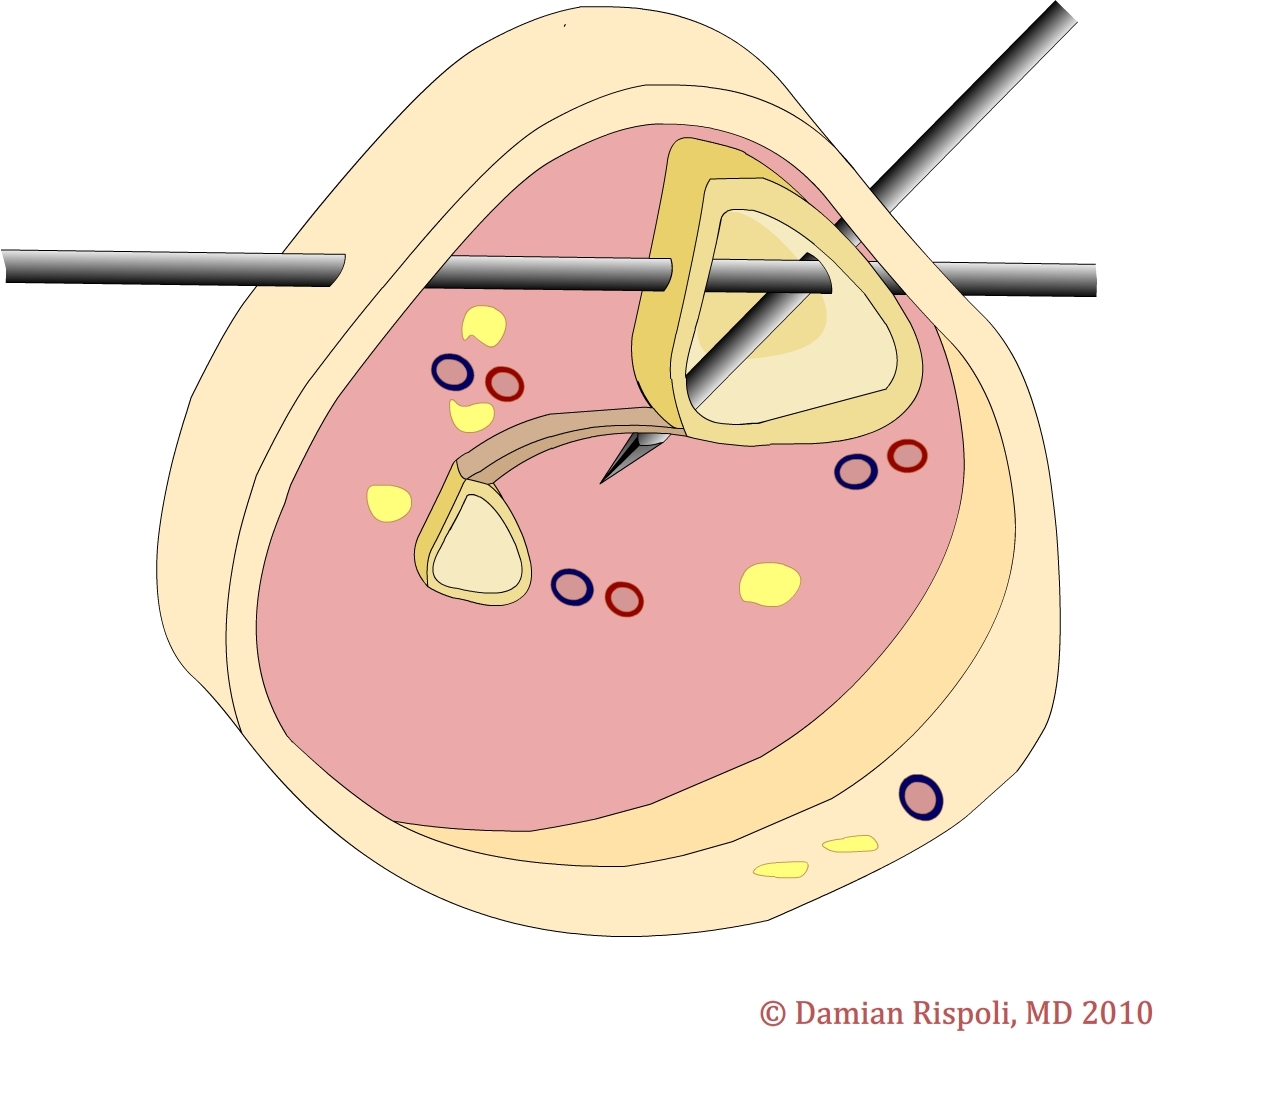
4. see diagram 1. Safe zone pin placement for the mid shaft of the femur. The lateral pins may also be used proximally.
5. see diagram 2. Safe zone pin placement for the distal femur. Transfixtion may be used; however, place pins proximal enough to avoid the joint capsule (2-3 finger breadths above the patella).
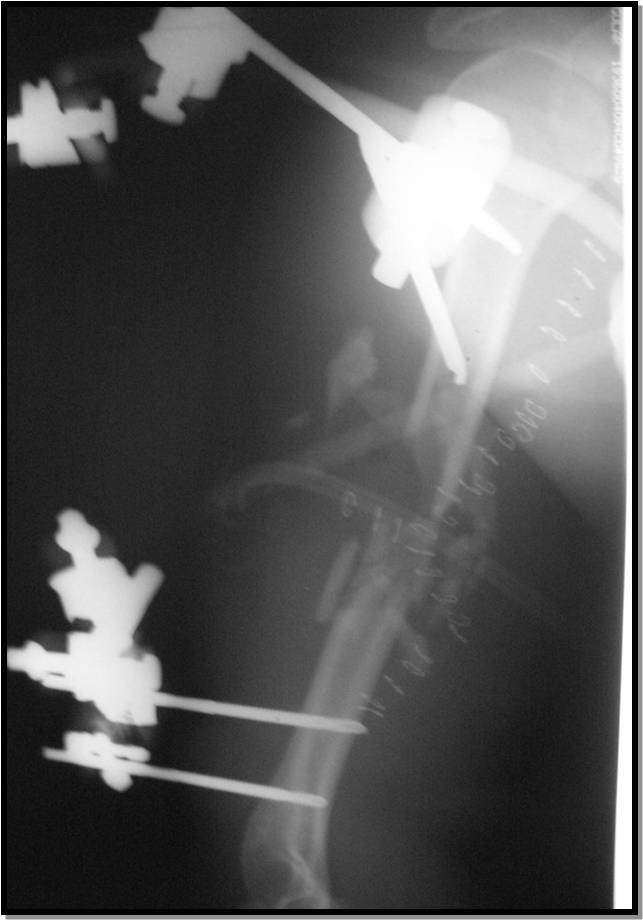
6. see figure 5. Anteroposterior radiographs of laterally placed half pins in the proximal femur.
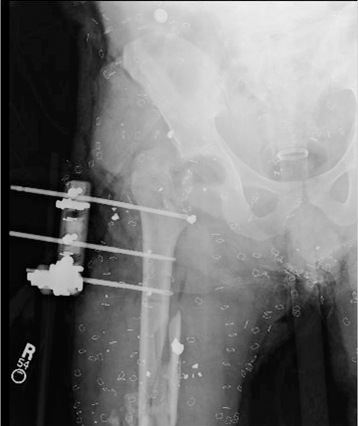
C. Knee
1. lateral pins in distal femur and anteromedial pins in proximal tibia may be bridged with additional bar-to-bar clamps
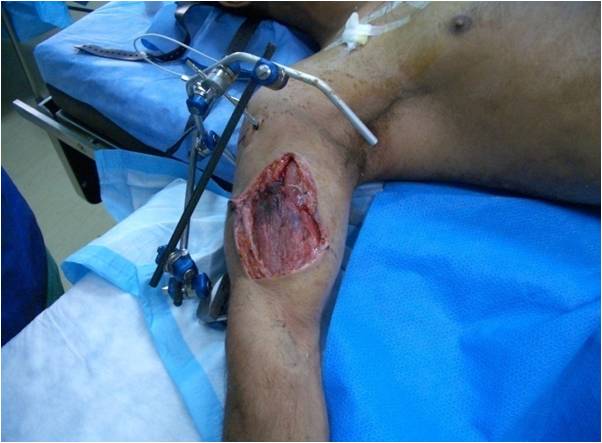
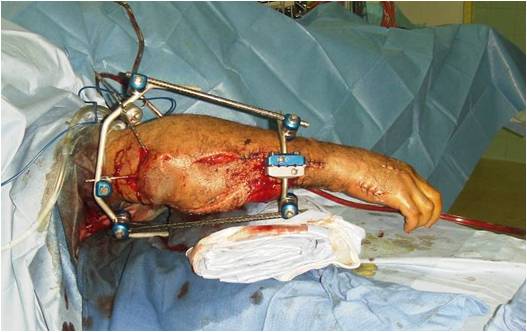
2. see figure 7. This clinical photograph demonstrates how the distal femur and proximal tibia may be bridged in order to span the knee.
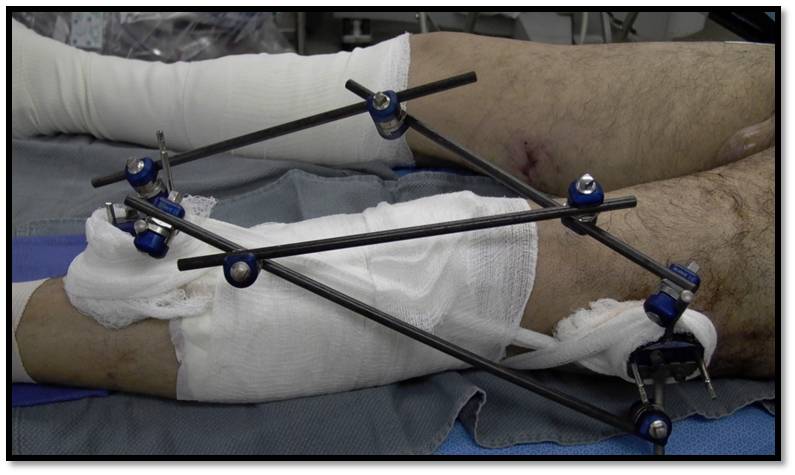
D. Tibia
1. half pins should be placed on anteromedial surface of bone; this is easily palpable as it is subcutaneous the entire length of the bone
2. see diagram 3. Safe zone pin placement in the tibia. Distally, the distal tibia and fibula may be crossed with one transfixation pin.
4. see figure 10. Biplanar control may also be achieved with half pins inserted on the anteromedial and anterolateral surfaces of the proximal tibia. Be aware of the peroneal nerve laterally.
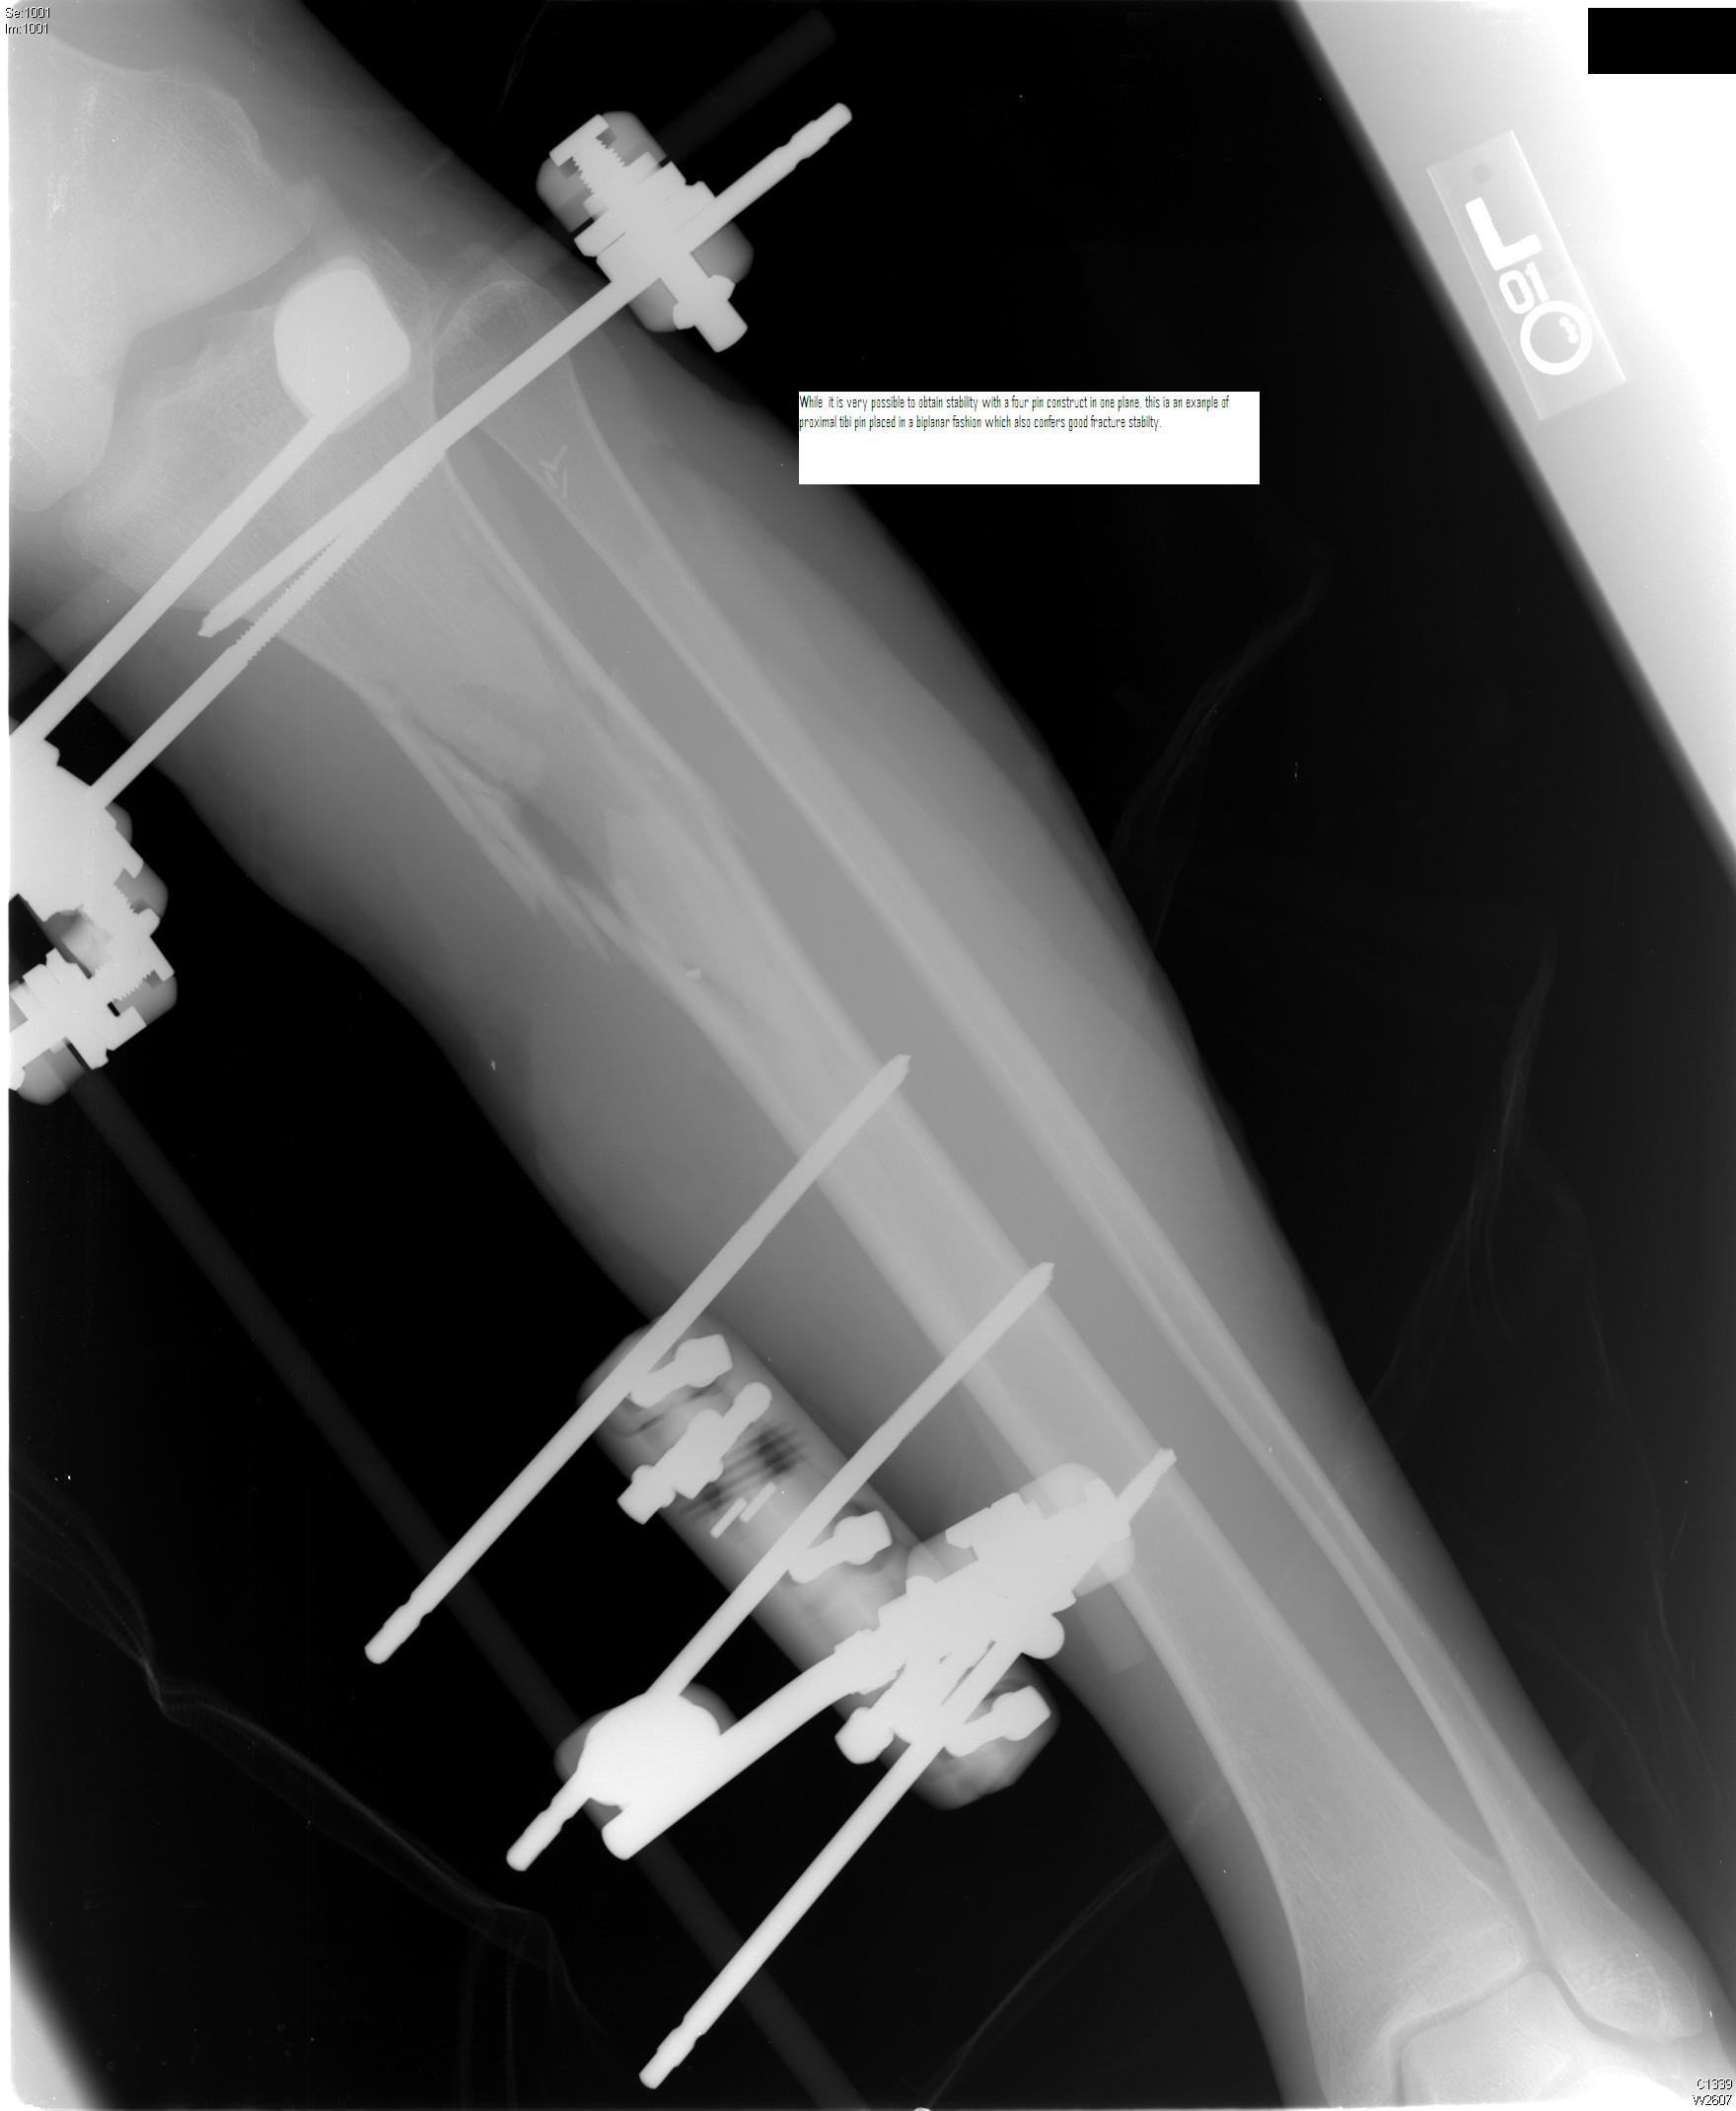
E. Ankle
1. ankle may be incorporated into lower extremity external fixators by delta-shaped construct or unilateral construct
2. transfixation pins may be inserted into calcaneus from medial to lateral position; ensure pin start point is posterior and distal to medial and lateral plantar nerves
3. proximal shaft of first metatarsal may accept pins perpendicular to long axis of metatarsal; do not enter base of metatarsal, as this may tether the tibialis anterior tendon
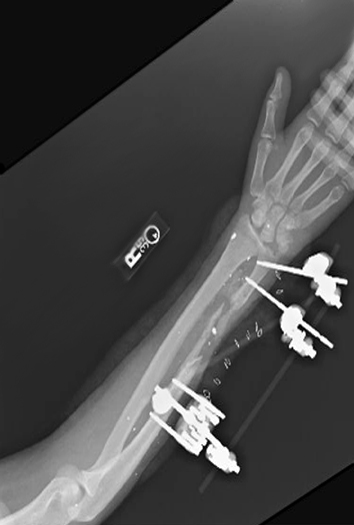
4. see figure 11. Anteroposterior radiograph of an ankle spanning external fixator with a calcaneal transfixation pin and a first metatarsal pin.
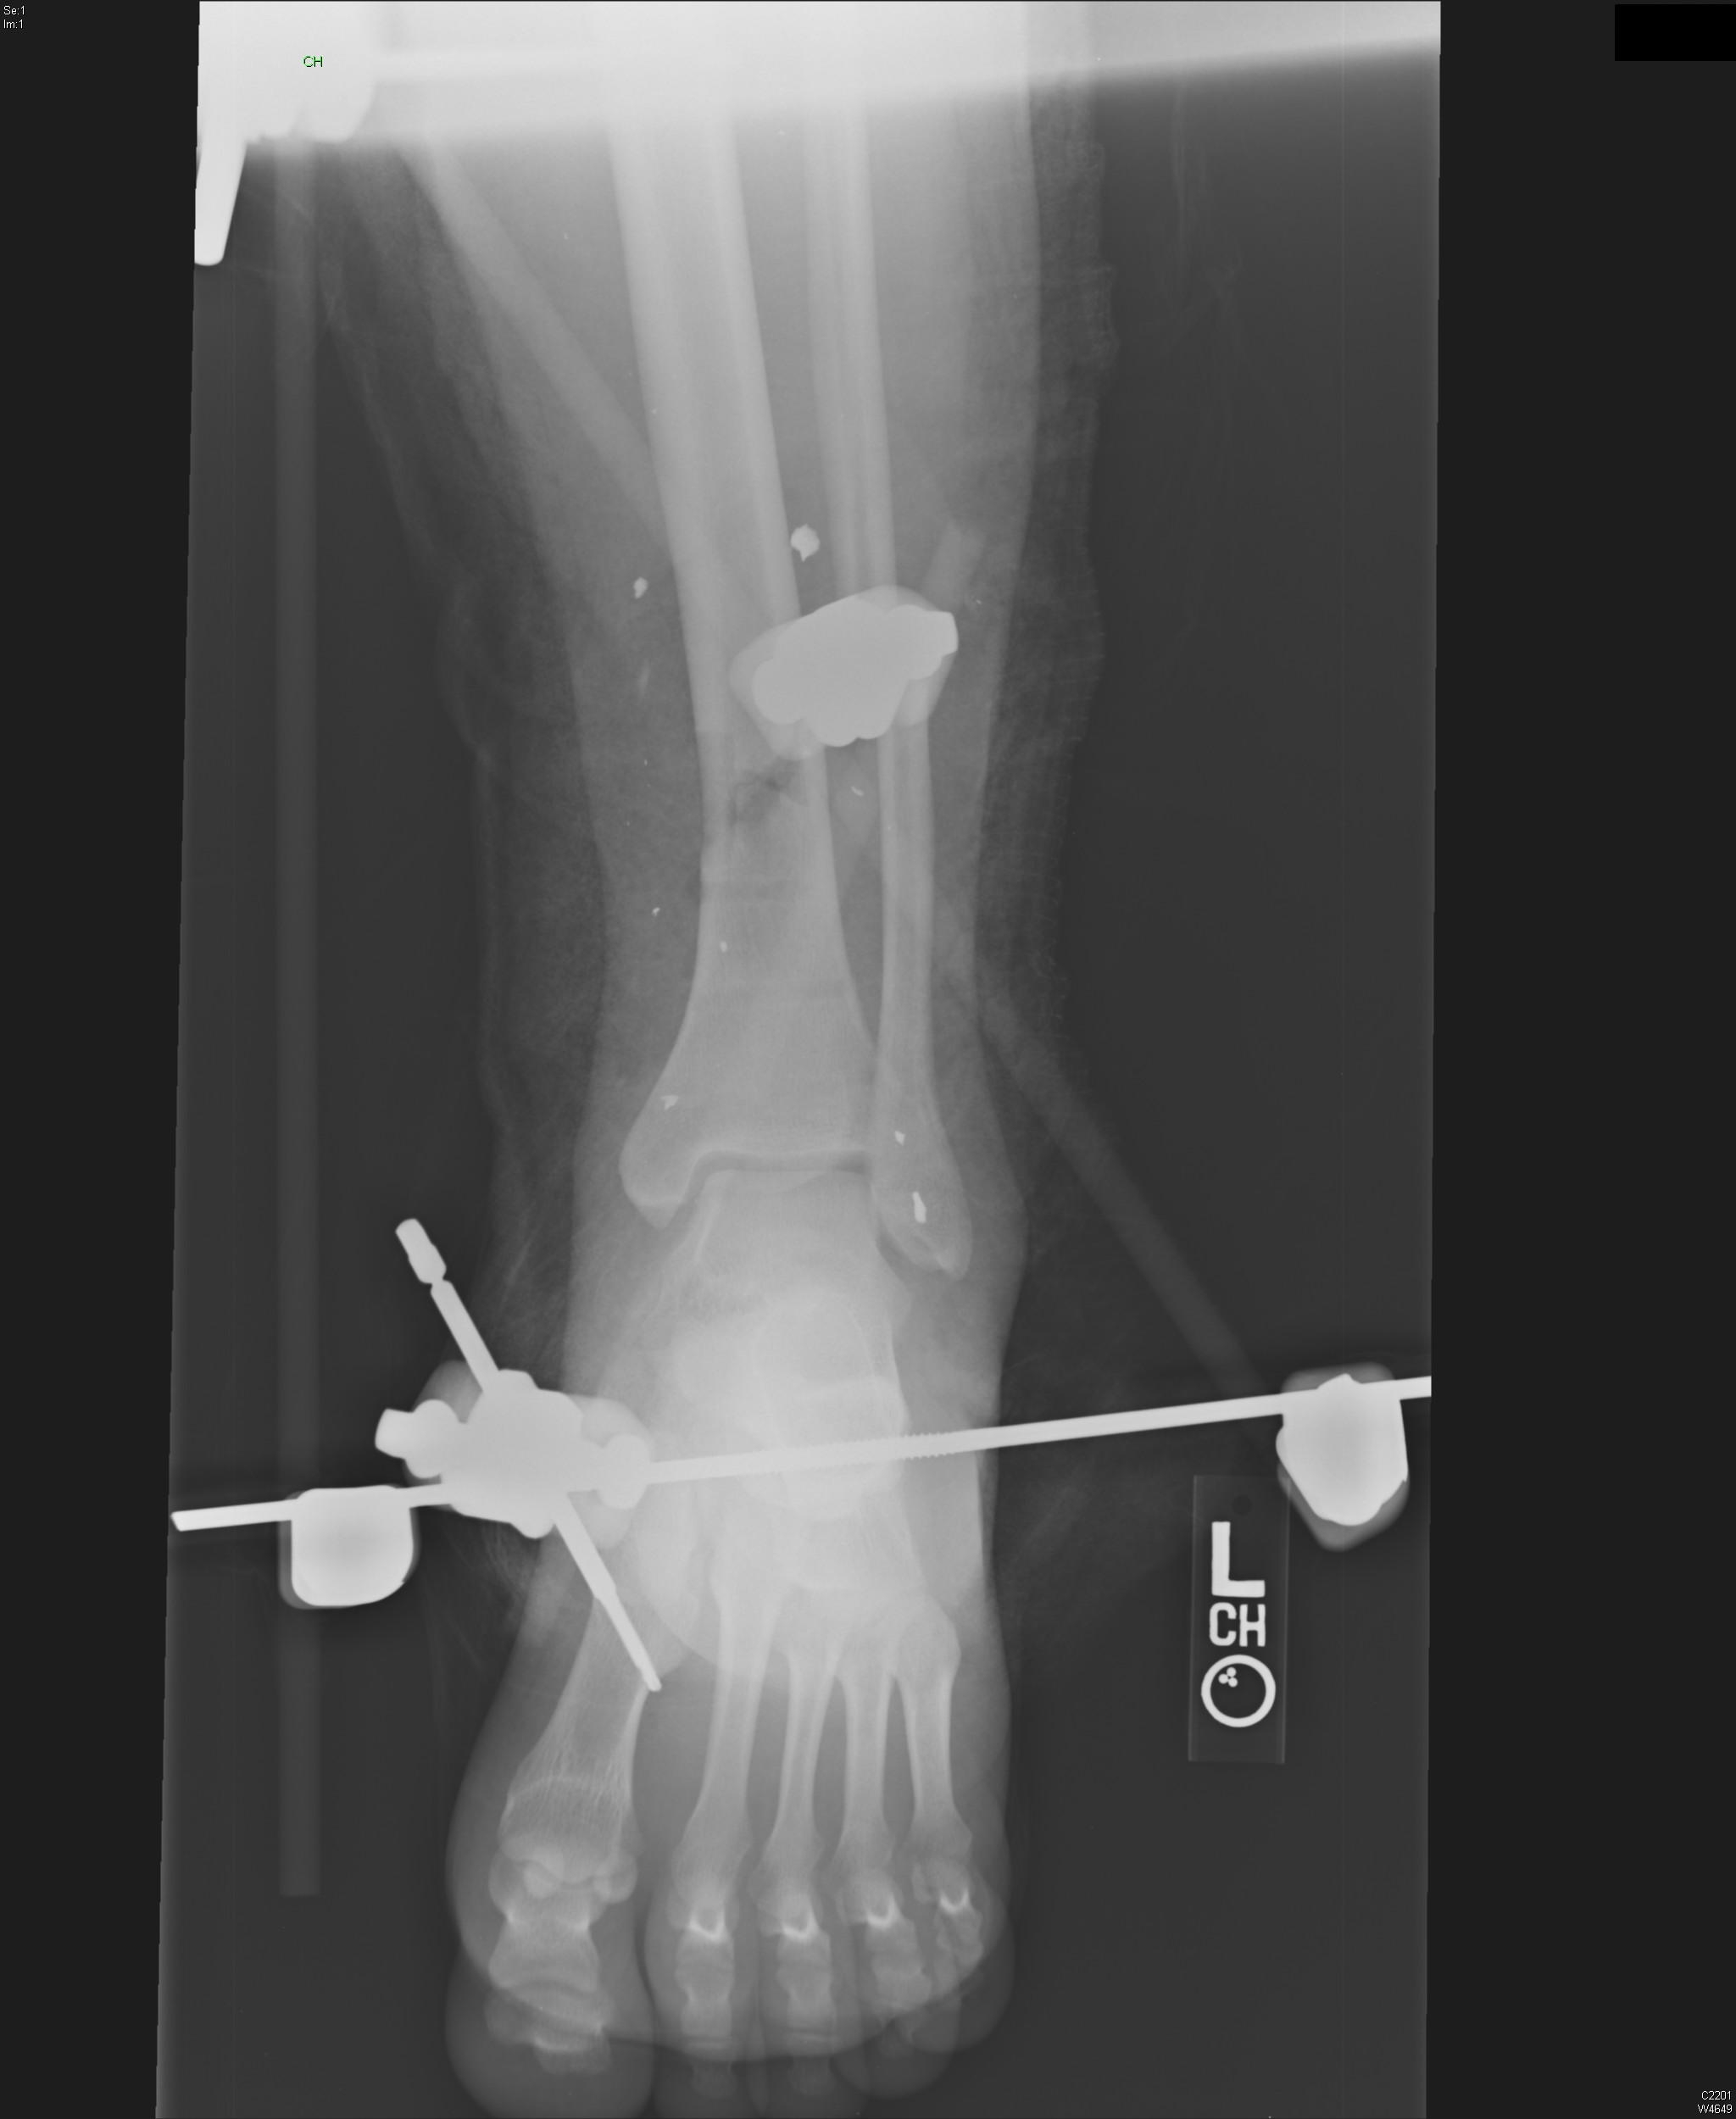
F. Humerus
1. lateral half pins are used; do not over-penetrate medial cortex proximally so as not to damage neurovascular bundle
2. anterior half pins may also be used
a. proximally, avoid palpable deltoid tendon
b. at mid shaft, do not over-penetrate posterior cortex so as not to damage radial nerve
3. see diagram 4. Safe zone pin placement for the humerus. The epicondyles may be transfixed distally, with caution given to ulnar nerve medially.
.jpg)
G. Elbow
1. half pins or transfixation pins may be placed laterally to medially; avoid anterior neurovascular structures and ulnar nerve groove posterior and medial to medial epicondyle by placing pins in plane with epicondyles, palpable on each side of elbow
H. Forearm
1. ulna is easily palpable and pins may generally be placed along any border; typically lateral entry pins are used, keeping in mind the ulnar nerve proximally
2. closed pin placement in proximal portion of radius is not recommended because of risk to posterior interosseous nerve; radial pins may be placed about distal portion
C. Define care guidelines for fractures of upper and lower extremities in the context of the host nation’s environment and the options available to the different patient groups
I. Considerations for Fractures Treated in Host Nation Casualties
A. One particular challenge for those administering medical care in host nation is high likelihood of treating host nation individual to whom unknown follow up care is available
B. While external fixation is generally not recommended in austere environment, certain low energy fractures may warrant open reductions and internal fixations or closed reductions and percutaneous pinning for host nation casualties
C. External fixation is also an option if transfer to higher level of host nation care is possible, or tempo of casualties and individual treatment facility allow for delayed internal stabilization
D. Low energy, closed fractures may also be definitely treated with splint or cast
E. In setting of high energy wound with extensive soft tissue loss, amputation that may be definitely closed in a short period of time must be considered; unavailability of prolonged and advanced surgical care makes difficult limb salvage challenging
Acknowledgements
The authors acknowledge LTC Joseph Hsu, MD and MAJ Glen Kerr, MD for the clinical photographs, video, and many of the radiographs and COL Damian Rispoli for the diagrams.
References
1. Holcomb J. The 2004 Fitt lecture: current perspectives on combat casualty care. J Trauma. 2005;59:990-1002.
2. Handicap International. “Preliminary findings about persons with injuries – Haiti earthquake 12 January 2010.” published January 29, 2010. http://www.handicap-international.us/in-the-world/states-of-intervention/programs. Accessed April 2010.
3. Possley DR, Burns TC, Stinner DJ, et al. Temporary external fixation is safe in a combat environment. J Trauma 2010;69:S135-S139.
Additional Resources
Camuso MR. Far-forward fracture stabilization: external fixation versus splinting. J Am Acad Orthop Surg 2006;14:S118-S123.
Emergency War Surgery, 3rd ed. Borden Institute, Walter Reed Medical Center: Washington, DC, 2004.
Hoppenfeld S. Approaches for external fixation, in Surgical Exposures in Orthopaedics, 4th ed. Lippincott Williams and Wilkins: Philadelphia, 2009.
The view(s) expressed herein are those of the author(s) and do not reflect the official policy or position of Brooke Army Medical Center, the U.S. Army Medical Department, the U.S. Army Office of the Surgeon General, the Department of the Army, Department of Defense or the U.S. Government.
Materials and support for The Disaster Preparedness Toolbox is provided by Lt Col. Ky Kobayashi, MD and Col. Benjamin Kam, MD.